Create and Deploy Signed Application Control (WDAC) Policies
Important
WDACConfig module can easily and quickly generate a Code Signing certificate to be used for signing Application Control (WDAC) policies.
This guide is only for those who want to learn how to setup a Windows Server with Active Directory and Certification Authority roles and create their own CA.
Introduction
-
By deploying a Signed Windows Defender Application Control policy, a system will be secure and resistant to any form of tampering (if coupled with Bitlocker and other built-in security features), in a way that even the system administrator can't tamper or disable this security policy.
-
The only way for this security feature to be turned off, modified, updated or disabled will be to have access to the certificate's private keys used to sign it.
-
Refer to Microsoft's website or my other wiki posts If you want to learn about WDAC itself and how to create a customized WDAC policy for your own environment.
-
Always test and deploy your WDAC policy in Audit mode first to make sure it works correctly, before deploying the Signed version of it.
- The WDACConfig module has an optional parameter called
-TestModethat will deploy the policies with Boot Audit on Failure and Advanced Boot Options Menu policy rule options.
- The WDACConfig module has an optional parameter called
-
Keep the xml file(s) of the deployed base policy(s) in a safe place, they are needed if you decide to disable or modify the signed deployed WDAC policy later on.

Video Guide

TL;DR (Short version)
- Install the latest Windows Server, Install AD/DS and AD/CS roles on it. (≈15 mins depending on hardware and if downloaded ISO or VHDX)
- Use the Enterprise CA's code signing template to create a customized certificate template for WDAC Signing (≈5 minutes)
- Generate the certificate and use it to sign the WDAC Policy (≈3 minutes)
That's essentially everything we have to do. So, if you are already familiar with the concepts, you can go straight to the bottom of this page and use the resources section to refer to Microsoft guides to create and deploy the Signed WDAC policy.
But if you aren't familiar, keep reading as I've thoroughly explained every step to set up Windows Server, generate signing certificate and sign the WDAC policy. It takes about 20 minutes for me (as you can see in the video) and depending on the hardware, it can even take less time.
Prerequisites
Latest Windows Server, it's free for 180 days for evaluation and comes in ISO and VHDX formats. Preferably use Windows Server insider vNext because it has the newest features and visual upgrades.
Once we have our Windows installation media (ISO or VHDX), we need to set up a Hyper-V VM on our host. For this guide, our host is a Windows 11 pro for workstations machine.
Create a Hyper-V VM with these specifications:
- Secure Boot
- Trusted Platform Module (TPM)
- At least 4 virtual processors
- At least 4 GB RAM
- At least ~20 GB storage
- Connect the Default Switch to the VM or create a Private Virtual switch in Virtual Switch Manager of Hyper-V manager, then add it as network adapter hardware to the VM.
Windows Server VM setup
After Windows Server installation has finished, you can create a Hyper-V standard checkpoint so you'll be able to restore the VM's state to this point in time if you misconfigure something later on.
Rename the server
Choose a meaningful name, like CAServer. Use this PowerShell cmdlet to easily do that, it will restart the server to apply the new name.
Using GUI: Install Active Directory Domain Services
From Server Manager => Add Roles and Features => Role-based or feature-based installation => Select the current server you are on => Select Active Directory Domain Services from the list => Select "Add Features" => Continue the rest of the steps by selecting Next.
After installation is over, open the notifications in the Server Manager, (there will probably be a yellow icon on it), Select "Promote this server to a domain controller".
In the Deployment Configuration window that will be opened, select "Add a new forest" and in the Root domain name, enter a domain name.
It can be anything, even Bing.com, but for our usage let's use CAServer.com. On the next step, set a password for DSRM (Directory Services Restore Mode), It needs to have uppercase, lowercase and numbers (e.g., Bing6969), write this password down somewhere, like in Sticky notes app on your host.
Next, choose a NetBIOS domain name, the default one will be OK. Confirm and proceed with the rest of the steps by selecting Next and at the end select Install. Wait for the installation to finish. It will restart the Server once the Installation is finished.
Using PowerShell: Install Active Directory Domain Services
Install (AD DS) role
Install a forest and set a forest password
$password = ConvertTo-SecureString 'Bing6969' -AsPlainText -Force

Install-ADDSForest -DomainName CAServer.com -DomainNetbiosName CASERVER0 -SafeModeAdministratorPassword $password -InstallDNS:$false -Force
Using GUI: Install Active Directory Certification Service and set up an Enterprise root CA (Certificate Authority)
From Server Manager => Add Roles and Features => Role-based or feature-based installation => Select the current server we are on => Select Active Directory Certification Service => Select Next for the rest of the steps and finally select install.
After installation is over, open the notifications in the Server Manager, (there will probably be a yellow icon on it), Select "Configure Active Directory Certificate Service on the destination server".
On the newly opened configuration window, on credentials section select next, on the Role services section check the box for Certification Authority and select next.
Select Enterprise CA (because Standalone CA does not support certificate templates that we are going to use) and select Next. On the CA Type section select Root CA. On the Private Key section select Create a new private key.
On the Cryptography section, for Cryptographic Provider choose RSA#Microsoft Software Key Storage Provider, for Key length choose 4096, for Hash Algorithm choose SHA512 and select Next. On the CA name section select next. On the Validity Period section set validity period to something like 50 Years. Select next for the rest of the sections and finally select Configure.
Using PowerShell: Install Active Directory Certification Services and set up an Enterprise root CA
Install Active Directory Certificate Services
Install a new Enterprise CA
Install-AdcsCertificationAuthority -CAType EnterpriseRootCa -CryptoProviderName "RSA#Microsoft Software Key Storage Provider" -KeyLength 4096 -HashAlgorithmName SHA512 -ValidityPeriod Years -ValidityPeriodUnits 50 -Force
Restart the server because it is required, and Server Manager says it too
Lastly do this so that Certification Authority option will be added to Server Manager => Tools and its GUI will become accessible and visible
Configure the Validity period of the issued certificates on the server
We Increase the validity period of the certificates issued by the CA to 30 years:
Restart the Server after this step.
You can verify and confirm the results using these commands:
Follow the official guide to create certificate template and generate the signing certificate
Now open Certification Authority, you can do so by searching for it in Windows search or from Server Manager => Tools. Once you open it, you can follow the guide from Microsoft to create the certificate template for WDAC policy signing and then request and create a certificate.
Note that If the Server doesn't have at least 1 network adapter connected to it, then Certificate Templates don't load,
Screenshot
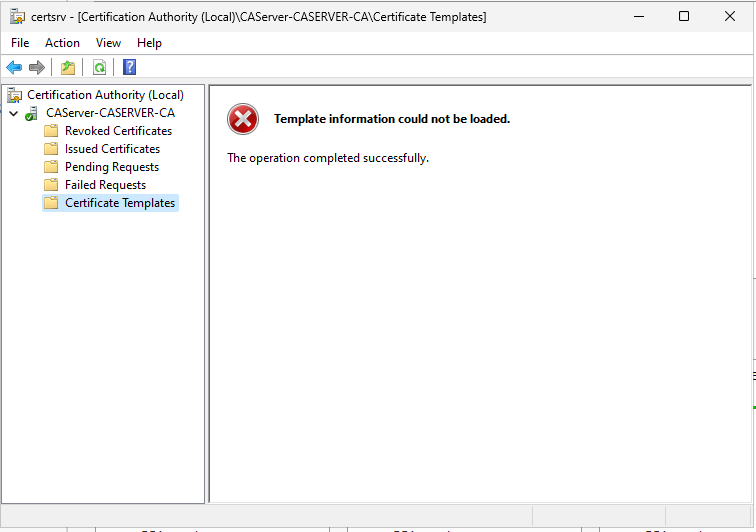
That's why our Hyper-V VM Server needs at least one Virtual Network Adapter.
The guide suggests using a client computer to request and create the certificate but since we are going to use the certificate for non-domain-joined computers and don't need to use the Active Directory, we can perform all of the steps on the same Windows Server VM.
These are some optional deviations from the official guide that result in creating a successful and more secure certificate for our WDAC policy signing:
-
On the Compatibility tab, you can select Windows Server 2016 from the Certification Authority list and select Windows 10 / Windows Server 2016 from the Certificate recipient list.
-
On the General tab, you can set the Validity period to 30 years and Renewal period to 22 years. (The maximum allowed Renewal period for the validity period we chose.)
-
On the Cryptography tab, you can set the Provider Category to
Key Storage Provider(KSP). Set the Algorithm Name toRSA. Set the Minimum key size to4096. Set Request hash toSHA512.
As the Microsoft's guide suggests, you need to go to security tab to verify account access of the user(s) requesting the certificate, but since we are requesting and creating our certificate on the same CA server, we don't need to change anything there.
If we want to use a 2nd PC to do this, as described in Microsoft document (Totally Unnecessary)
Additional steps to perform on Windows Server
If you are going to create a new user account in "Active Directory Users and Computers" for use on the client VM, in Certification Authority when duplicating the certificate template, go to Security Tab and set the correct permissions for that user account so that it will be able to request and enroll the certificate. For instance, since you are the only person who is going to use the Active Directory, you can even give `Full Control` permission to `Authenticated Users` group. Alternatively, you can use the same administrator account that you are currently using on Windows Server, which exists by default in the Active Directory, to log into the other client computer. One can log into multiple computers with the same user account across an Active Directory domain. There is no limit by default to how many concurrent logins an active directory user can have. Make sure the Windows Server and Windows client VMs both use the same Hyper-V Private Virtual switch network adapter. The VMs need to have static IP addresses on the same subnet in order to communicate with each other. Go to Windows Settings => Network & Internet => Ethernet => in "IP Assignment" select "Edit" => Set it to "Manual" => Toggle the IPv4 => in IP Address Enter `10.10.10.1` and in Subnet Mask enter `255.0.0.0`. Without configuring anything else, save it. Use the Edit button for DNS server assignment, set it to Manual, toggle the IPv4 button and in the Preferred DNS field enter `127.0.0.1`. Save everything and exit settings.Steps to perform on Client VM
Make sure the client VM is running the latest version of Windows, and it follows the same prerequisites explained above. Go to Windows Settings => Network & Internet => Ethernet => in "IP Assignment" select "Edit" => Set it to "Manual" => Toggle the IPv4 => in IP Address Enter `10.10.10.2` and in Subnet Mask enter `255.0.0.0`. Without configuring anything else, save it. Now use the Edit button for DNS server assignment, set it to Manual, toggle the IPv4 button and in the Preferred DNS field enter the static IP address of the Windows Server VM, which was `10.10.10.1`. Save everything and exit settings. Open an elevated PowerShell and enter this to join the Active Directory domain: You will be asked for credentials. If you are going to use the same Administrator account from Windows Server, use `Administrator` for username and enter the password of the Windows Server in the password field, otherwise use the password you set when creating the new user account in Active Directory Users and Computers. After the client machine restarted, use `Other user` option on the lock screen and this time you will be using the Active Directory credentials to log into the machine. If using the built-in Administrator account, the password will be the same as the password on Windows Server account, but the username will be in the
Create a Signed WDAC policy
Once we have the certificate in the User Certificates store of either the Windows Server or a client machine, Right-click on it => All tasks => Export. Export the Private key and export all the Extended Properties, set a password for the certificate and set Encryption to AES256-SHA256. Select a location to export and it will create a .pfx file.
You also need to export the certificate without private key, in DER encoded binary X.509 format which will create a .cer certificate file. We need this certificate to sign the WDAC policy.
It is important to keep these 2 files, specially .pfx that contains the private key, in a safe place, such as Azure Key Vault Managed HSM or OneDrive Personal Vault, so that if you delete all the VMs you created, you will be able to continue using the same certificate to sign further WDAC policies and supplemental policies, at least for the next 22 years, before it needs a renewal. As you can see, all of that setup must be done just once every few decades.
The Personal Information Exchange (.pfx) file has great importance because it contains the Public key and Private key of the certificate so anyone who has access to this file can disable the deployed Signed WDAC policy. It should never be shared with anyone outside your circle of trust. It is a password-protected file by nature.
Use WDACConfig module to sign and deploy WDAC policies
WDACConfig module with the Deploy-SignedWDACConfig cmdlet can automate the entire process of signing and deploying a signed WDAC policy.
Note
The Deploy-SignedWDACConfig cmdlet will offer to automatically download the SignTool.exe from the Microsoft server if it cannot find it on your system.
If you want to manually download it, here are the steps:
Run it and only select Windows SDK Signing Tools for Desktop Apps to install. After that signtool.exe will be placed at C:\Program Files (x86)\Windows Kits\10\bin and the WDACConfig module will automatically detect and use it for signing. You can even copy the executable to another location for later usage on another system where SDK is not installed and then use the optional -SignToolPath <String> parameter of WDACConfig module to browse for executable.
- SignTool is also included in the Windows ADK but the one in SDK is the newest and recommended place to get it.
System Behavior After Deploying a Signed Application Control Policy
Activation Process
After the signed Application Control (WDAC) policy binary .cip is copied to the EFI partition as part of the deployment process, and system is restarted once, we can see in System Information that Application Control User-Mode is being enforced and when you try to install an application not permitted by the deployed policy, it will be successfully blocked.
At this point, since we are using UEFI Secure Boot, the Anti Tampering protection of the Signed policy kicks in and starts protecting WDAC policy against any tampering. We need to reboot the system one more time, to verify everything and make sure there is no boot failure.
Deploying a Signed WDAC policy without restarting is the same as deploying Unsigned policies, because the Signed policy can be easily removed just like an Unsigned policy. So always make sure you restart at least once after deploying a Signed WDAC policy.
If Someone forcefully deletes the deployed WDAC policy file
-
Deleting the
.cippolicy file fromC:\Windows\System32\CodeIntegrity\CiPolicies\Activeand then restarting the system multiple times won't have any effect at all on the status of WDAC. It will continue to work, and enforcement status will be shown in System Information. This is how it protects itself against rogue administrators. -
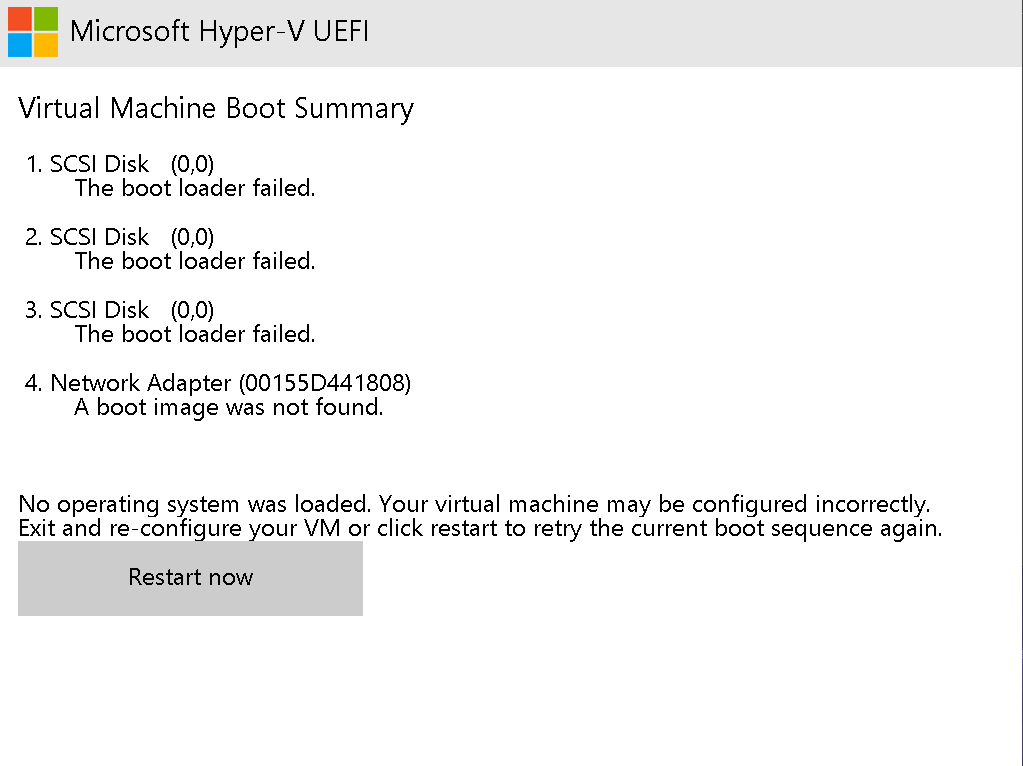
Deleting the
.cippolicy file from theEFIpartition located at\EFI\Microsoft\Boot\CIPolicies\Activeand restarting the device will result in a boot failure. Before system restart, nothing happens and it will remain active. This is another self-protection method of a Signed WDAC policy. To recover from this state, the person will need to disable Secure Boot in the UEFI firmware settings. There are only 3 scenarios at this point:-
If, as suggested in the Security Recommendations, you set a strong password for the UEFI firmware of your hardware, they can't access the firmware. This security measure alongside the rest of the Windows built-in security features such as BitLocker device encryption will provide the Ultimate protection for a Windows device against any threats and any person, no matter physical, real-life or Internet threats.
-
If UEFI firmware is not password protected, the person can disable Secure Boot and/or TPM in UEFI firmware settings, they can even flash the entire UEFI firmware memory by physically abusing the device to get past the UEFI password, but since the device is BitLocker protected, a total Lock Down will be triggered and the person will need to provide the 48-digit recovery key of the OS drive in order to even complete the boot process into Windows lock screen. Assuming the person also has access to the Windows PIN, they will additionally need to provide 48-digit recovery password of any subsequent BitLocker protected drive(s) in order to access them (if the drive(s) aren't set to be auto-unlocked with OS drive). This is more than Security-In-Depth. If UEFI firmware has any unpatched vulnerability, Device Guard features will take care of it.
-
Since steps 1 and 2 are impossible to bypass for a rouge person, there will be only one option left. To completely recycle the physical device, get rid of the inaccessible hardware such as SSD and then sell the remaining hardware parts. Either way, your data remains secure and inaccessible to any unauthorized person(s) at all times.
-
Screenshot of a message after forcefully deleting a Signed WDAC policy from the EFI partition
What Happens When We Turn On Smart App Control
Smart App Control works side-by-side any signed or unsigned Application Control policy (WDAC) because it is itself a special type of WDAC policy. It will be in enforced mode and continue to do its job.
Dual boot OS configurations
When you deploy a Signed WDAC policy on a system that uses Secure Boot, it will be enforced on all of the OSes that boot on the physical machine, because the policy resides on the EFI partition and is not tied to any specific OS. That means if you perform a clean install of a second Windows OS or natively boot a VHDX (Hyper-V VM), the policy will apply to them as well.
Extras
How to interact with the hidden EFI partition
Using Diskpart, Open an elevated PowerShell console and run these commands one by one:
diskpart
list disk
# double check to make sure it's the correct disk if you have more than 1
select disk 0
list part
# The EFI partitions type is System, and its size is approximately 100MB, make sure you choose the correct one
select part 1
assign letter=z
The EFI partition will be available in This PC with letter Z, but you can't access it without modifying permissions. There is however an easier way to access it and manually copy the Signed WDAC policy binary to it. Open Task Manager as admin, select Run New Task, select Browse and now you can access drive Z (EFI partition) and copy the Signed .cip file in Z:\EFI\Microsoft\Boot\CIPolicies\Active.
How to find the FQDN (Fully Qualified Domain Name) of the Windows Server
Using PowerShell
or
You can also use GUI of Server Manager => Local Server
The syntax is: Computer_Name.Domain
So, if:
- Computer Name:
CAServer - Domain:
CAServer.com
then FQDN is: CAServer.CAServer.com
Resources
- Use signed policies to protect Windows Defender Application Control against tampering
- Create a code signing cert for Windows Defender Application Control
- Deploying signed policies
- WDAC Policy Wizard
- Generate Windows Defender Application Control (WDAC) policies Online
- WDAC policy creation - Australian Government
- Understand Windows Defender Application Control (WDAC) policy rules and file rules
- Install Active Directory Domain Services
- Install-AdcsCertificationAuthority
- Install the Certification Authority
- Comparison of Standard, Datacenter, and Datacenter: Azure Edition editions of Windows Server 2022
- Remove Windows Defender Application Control (WDAC) policies
- Add-SignerRule